Windows 7 News Christmas Themepack For Windows 7


The new theme is a red Christmas theme for Windows 7 featuring both photos and drawn pictures of scenery related to Christmas.


The Christmas themepack has a size of less than nine Megabytes and comes with a total of nine different background images suited for all audiences. Take a look at the images below to see if this could be a nice theme for your desktop.

Windows 7 users simply need to unpack the themepack and double-click the .themepack file to automatically load it as a new theme.

Read More

How to Create a Windows 7 System Repair Disc


This will show you how to create a Windows 7 system repair disc to use to boot to the system recovery options if you don't have a Windows installation disc, can't find your Windows installation disc, or can't access the recovery options provided by your computer manufacturer.


1. Open the Start Menu.

A) In the search line, type recdisc.exe and press Enter. (See screenshot below)

System Repair Disc - Create-start_-menu.jpg

B) Go to step 3.

OR

2. Open the Control Panel (All Items view), and click on the Backup and Restore icon.

A) Click on the Create a System recovery disc link in the left blue pane. (See screenshot below)

System Repair Disc - Create-backup_and_restore.jpg

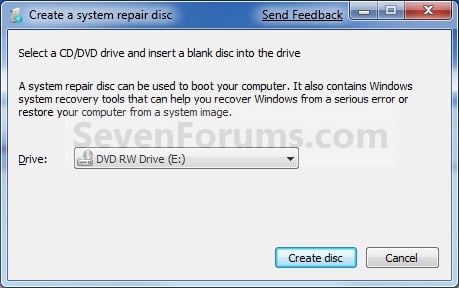
3. Insert a blank CD or DVD into your CD/DVD drive and click on the Create disc button. (See screenshot below)

NOTE: If you are prompted to insert a Windows installation disc, it means that the files needed to create the system repair disc cannot be found on your computer. Insert a Windows 7 installation disc.

System Repair Disc - Create-step1.jpg

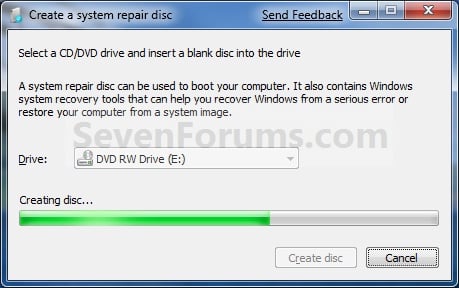
4. It will now start creating the System Repair Disc. (See screenshot below)
NOTE: If a AutoPlay window pops up, just close it.

System Repair Disc - Create-step2.jpg

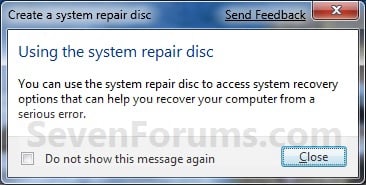
5. When it's finished, click on the Close button. (See screenshot below)

System Repair Disc - Create-step3.jpg

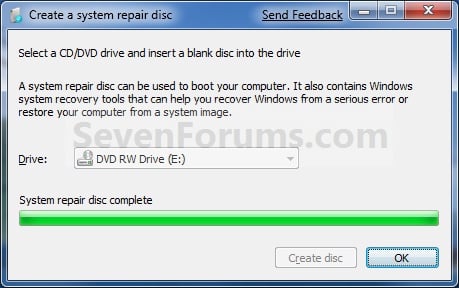
6. Click on OK. (See screenshot below)

System Repair Disc - Create-step4.jpg

7. Remove and label your new Windows 7 System Repair Disc from the CD/DVD drive.
Read More

How to Run the Memory Diagnostics Tool in Windows 7


This will show you how to run the Windows Memory Diagnostic Tool to test the Random Access Memory (RAM) on your computer for errors in Windows 7. The diagnostic includes a comprehensive set of memory tests. If you are experiencing problems while running Windows, you can use the diagnostic to determine whether the problems are caused by failing hardware, such as RAM or the memory system of your motherboard.

Tip (windows7park.blogspot.com)
  If you suspect memory issues, then you may also want to consider using and running Memtest86+ at boot. Memtest86+ is a comprehensive stand-alone memory diagnostic program that you boot from at startup to test your RAM. You can download a ISO file to burn to DVD to boot with, or a floppy disk package installable from Windows to a USB flash drive or floppy disk to boot with.
1. To Start from within Windows 7 

-A) Open the Control Panel (All Items View).

B) Click on the Administrative Tools icon, and click on Memory Diagnostics Tool.

C) Go to step 1F below.

OR

D) Open the Start menu.

E) In the Start Menu search box, type mdsched and press Enter. (See screenshot below)


F) Select the Restart now and check for problems option. (See screenshot below)


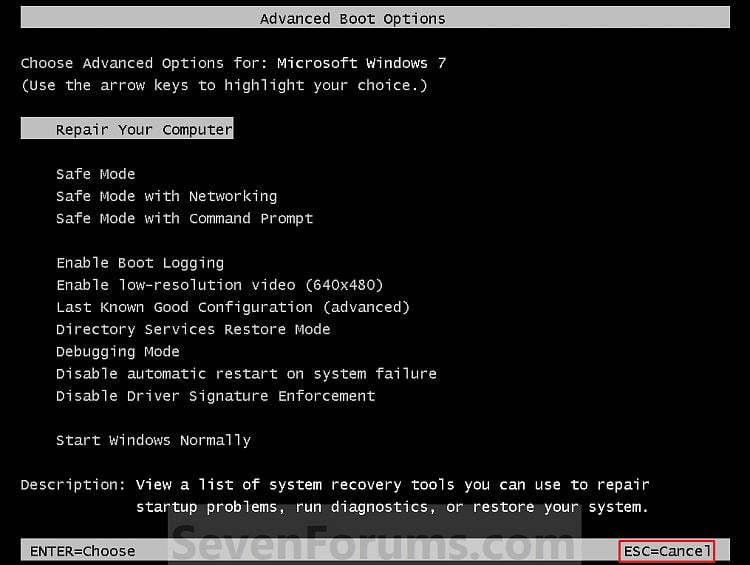
2. To Start from Windows Boot Manager - A) Boot into the Advanced Boot Options (press F8 while restarting) screen.

B) While in the Advanced Boot Options screen, press the Escape (Esc) key. (See screenshot below)
Memory Diagnostics Tool-advanced-1.jpg
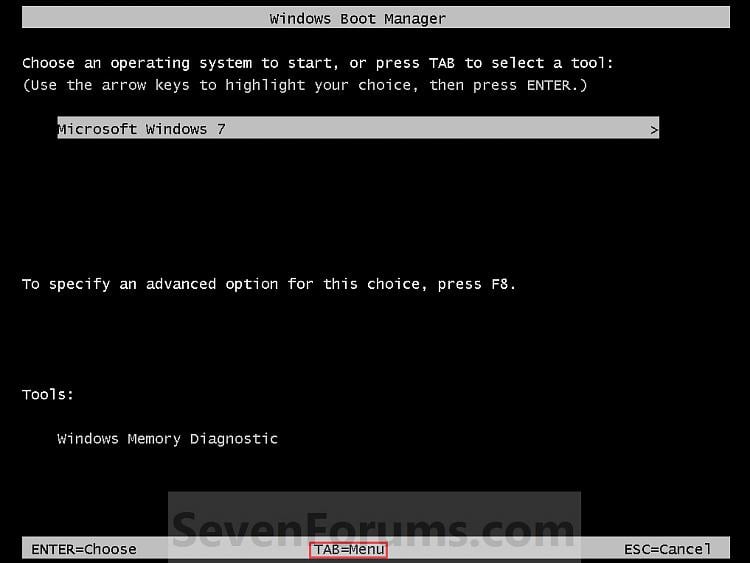
C) While in the Windows Boot Manager screen, press the Tab key. (See screenshot below)
Memory Diagnostics Tool-advanced-2.jpg
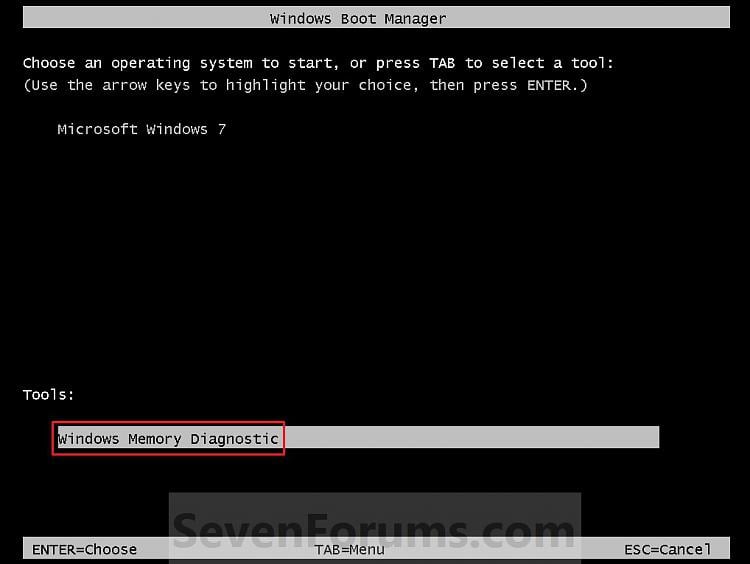
D) With Windows Memory Diagnostics selected, press Enter. (See screenshot below)
Memory Diagnostics Tool-advanced-3.jpg
E) Go to step 4.
3. To Start from System Recovery Options -
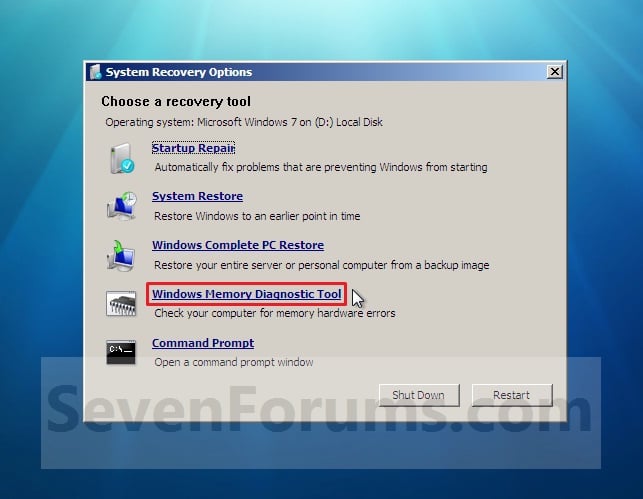
A) Boot into the System Recovery Options screen.

B) Select the Windows Memory Diagnostic Tool option. (See screenshot below)
Memory Diagnostics Tool-system_recovery_options.jpg
C) Select the Restart now and check for problems option. (See screenshot below)
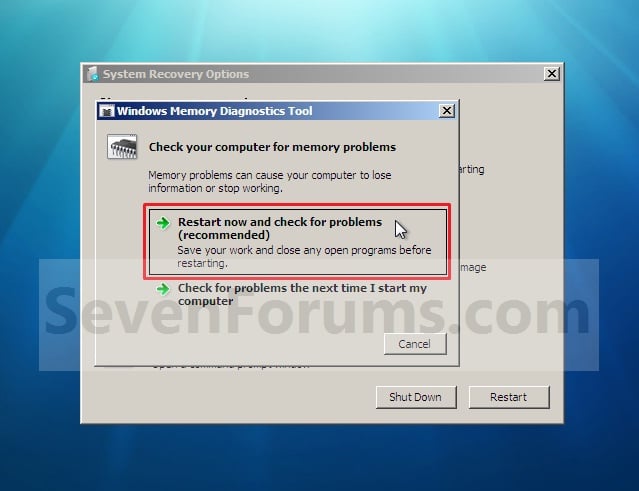
Memory Diagnostics Tool-select_when.jpg
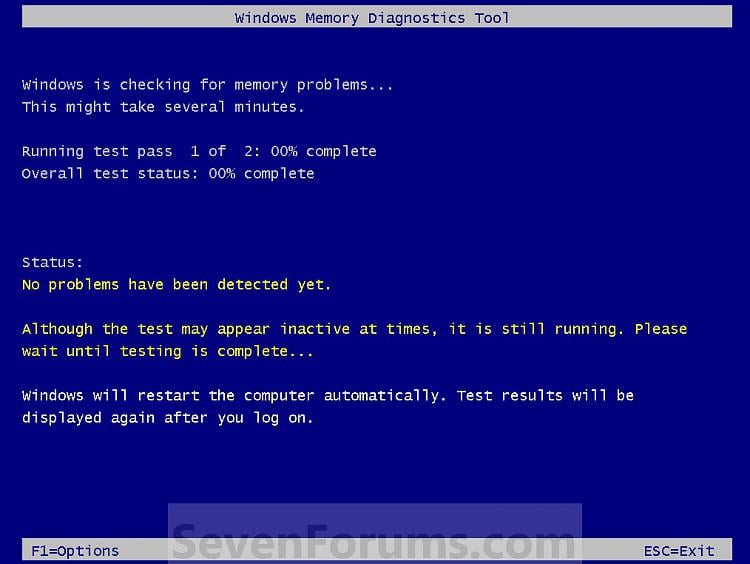
4. The computer will now restart, and you will see this screen next. (See screenshot below.
NOTE: Windows Memory Diagnostic Tool will run the Standard test by default.
Memory Diagnostics Tool-1.jpg

A) Go to step 6.
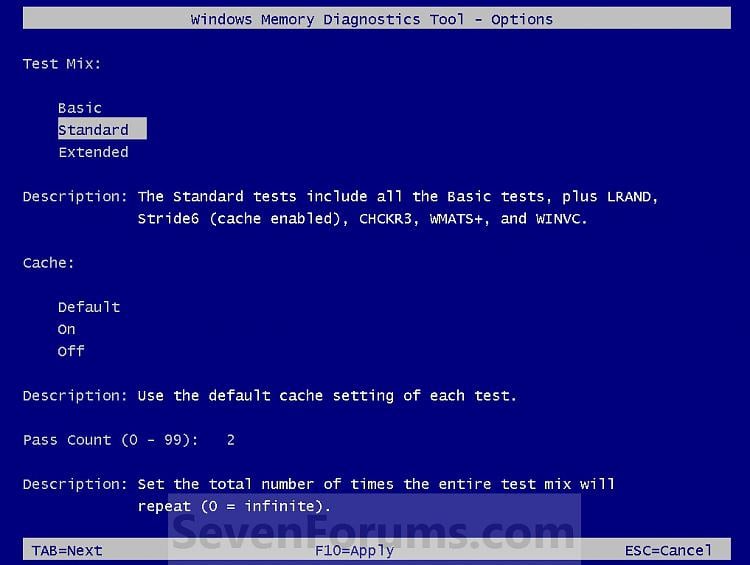
5. To Change the Memory Diagnostic Tool Options -
A) Press F1. (See screenshot above)
NOTE: If you have a multimedia keyboard, then you may need to press the Function (F-Lock) key for F1 to work.

B) Press the TAB key to switch between the option categories, and use the arrow keys to select the option. (See screenshot below)
Memory Diagnostics Tool-options.jpg
C) When finished, press F10 to apply any changes you made to the options. (See screenshot above)
NOTE: Press the Escape (Esc) key if you do not wish to make any changes to the options and return to the screen below step 4.
6. When the test is finished running, it will automatically restart the computer.

NOTE: If errors are found, the Windows Memory Diagnostics Tool will attempt to determine which particular memory module in your computer is causing these errors. If that information is available, it will be stated in the results after you log on from the restart. If bad memory is found then you will need to remove that memory and replace it.
Read More

Firefox Windows 7 Theme


As per my choice, Firefox is the No 1 Browser in the world and millions of users are using it since more than 3years. In firefox out of the box has a very grey and boring theme, that doesn’t sit well with Windows 7, but this can be improved by installing this Firefox theme for Windows 7.  The Windows 7  theme currently only works with Firefox 3.5, but full 3.6 support will probably be added once its beta is over.   

To install just download the file and copy the userChrome.css in this archive to %appdata%/Mozilla/Firefox/Profiles//and reopen Firefox.  To get the Aero Glass effect you also need to install the Firefox Addon Glasser.
Read More

Windows 7 Cheat Sheet


http://www.denversbdc.org/UserFiles/Image/Windows%207.jpg
Here’s a little cheat sheet I made up for some of the handy new hot key combination, many of which I’ve become quite dependent on!

From Desktop

  1. Windows Key + Tab : Aero [press Tab to cycle between Windows]
  2. Windows Key + E : Windows Explorer is launched.
  3. Windows Key + R : Run Command is launched.
  4. Windows Key + F : Search (which is there in previous Windows versions too)
  5. Windows Key + X : Mobility Center
  6. Windows Key + L : Lock Computer (It is there from the earlier versions as well)
  7. Windows Key + U : Launches Ease of Access
  8. Windows Key + P : Projector
  9. Windows Key + T : Cycle Super Taskbar Items
  10. Windows Key + S : OneNote Screen Clipping Tool [requires OneNote]
  11. Windows Key + M : Minimize All Windows
  12. Windows Key + D : Show/Hide Desktop
  13. Windows Key + Up : Maximize Current Window
  14. Windows Key + Down : Restore Down / Minimize Current Windows
  15. Windows Key + Left : Tile Current Window to the Left
  16. Windows Key + Right : Tile Current Windows to the Right
    [Continue pressing the Left and Right keys to rotate the window as well]
  17. Windows Key + # (# is any number) : Quickly Launch a new instance of the application in the Nth slot on the taskbar. Example Win+1 launches first pinned app, Win+2 launches second, etc.
  18. Windows Key + = : Launches the Magnifier
  19. Windows Key + Plus : Zoom in
  20. Windows Key + Minus : Zooms out
  21. Windows Key + Space : Peek at the desktop

From Windows Explorer

22. Alt + Up : Go up one level
23. Alt + Left/ Right : Back/ Forward
24. Alt + P : Show/hide Preview Pane

Taskbar modifiers

25. Shift + Click on icon : Open a new instance
26. Middle click on icon : Open a new instance
27. Ctrl + Shift + Click on icon : Open a new instance with Admin privileges
28. Shift + Right-click on icon : Show window menu (Restore / Minimize / Move / etc). Note: Normally you can just right-click on the window thumbnail to get this menu.
29. Shift + Right-click on grouped icon : Menu with Restore All / Minimize All / Close All, etc.
30. Ctrl + Click on grouped icon : Cycle between the windows (or tabs) in the group


Read More

Windows 7 Manager v1.1.5


Windows 7 Manager is a system utility that helps you optimize, tweak, and clean up Windows 7. It will increase your system speed, improve system security, and meet all of your expectations.

Why Should I use Windows 7 Manager?
Windows 7 is the newest Operating System for home users and professionals alike. Windows 7 brings clarity to your world, so you can more safely and easily accomplish everyday tasks and instantly find what you want on your PC.

Windows 7 Manager is the powerful software tool to tweak and optimize your Windows 7, it bundles more than 30 different utilities in one and help your system faster and more stable, secure and personal!

Features and Benefits of Windows 7 Manager:
* Information
Get detailed system and all hardware information on your system; help you find out the installation key of Windows, Office products; show all detailed information of running processes and threads on your machine; Windows 7 Manager offers 1-clicking cleans your system automatically.

* Optimizer
Tweak your system to improve windows startup and shutdown speed; tweak your hardware to increase system speed and performance; Optimize Task Schedule to turn off unnecessary system tasks.

* Cleaner
Find out which files or folders engross your disk space and shown with chart; Find and clean junk files to increase Hard Disk space; Duplicate Files Finder can scan your computer for files with the same size, name and modification time; Registry Cleaner can easily checks your registry and repair incorrectly linked registry entries, automatically remove invalid entries; Registry Defrag rebuilds and re-indexs your registry to reduce application response time and registry access time.

* Customization
Control what is started on Windows startup; tune up Windows 7 boot menu; edit context menus of mouse Right-Clicking; customize system desktop, menus, toolbar and notifications settings; automatically change your desktop wallpaper on background.

* Security
You can improve desktop, menus, Windows logon securities, and enable numerous hidden performance options of system, disable system updates and error reports; hide and restrict to access drives, specify which applications are not allowed to be executed on your computer; encrypt/decrypt and shred files, change the location of system folders; Privacy Protector can maintain your personal privacy by eliminating the tracks that you leave behind; create lots of randomization password once.

* Network
Optimize your Internet connection speed, manage all shares items; tweak your Internet Explorer easily.

* Misc. Utilities
Show the collection of Windows utilities; split and merge any file.

What's new in Windows 7 Manager 1.1.5:
· Junk File Cleaner updated to v1.4, fix the bug for multi-OS.
· Privacy Protector updated to v1.5
· System Information updated to v1.2
· Logon Background Changer updated to v2.0
· Visual Customizer updated to v2.0
 

x86 Download

Read More

Windows 7 ReadyBoost: What is it, How to use it ?


What is ReadyBoost?

http://nohya.files.wordpress.com/2007/08/readyboost.jpg

A feature first introduced in Windows Vista, ReadyBoost is a way to use most kinds of flash memory (USB drive, SD Card, Compact Flash) to help speed up your system by using it in addition to your physical memory as disk cache. Basically, it is almost like adding more RAM on-the-go without having to crack open your PC case and install it. The feature uses a technology called Superfetch which basically pre-loads information for applications enabling them to start-up more quickly than usual. This is capable because it frees up physical memory and because flash memory can read-write faster than a hard drive.

Can I use ReadyBoost & what are the minimum system requirments?
The requirements for ReadyBoost are fairly basic and should apply to almost any PC made within the last 10 years:
  • The computer must have USB 2.0 compatibility
  • The USB drive or flash must be USB 2.0 capable
  • The removable media’s capacity must be at least 256 MB—250 MB after formatting.
  • Vista only allowed less than 4GB of memory for ReadyBoost, but Windows 7 allows up to eight devices for a maximum of 256 GB of additional memory.

How do I use ReadyBoost?
  • Plug in your USB flash drive or flash memory card into your computer.
     
  • The computer should detect the device and AutoPlay should pop-up, click on Speed up my system.
     
  • If AutoPlay is not enabled, click on Computer, then right-click on the USB flash drive or flash memory card, and click on Properties then the ReadyBoost tab. Click the Use this device option and choose how much space you would like to associate with this device by moving the slider. You can allocate all of the memory on the device by checking the Dedicate this device to ReadyBoost, then Click OK.
    Note: Any space that is allocated for use with ReadyBoost will not be usable space for saving files with this device.
     
  • If at any time you would like to revert the device back for normal use, right-click on the Properties option, then the ReadyBoost tab and check Do not use this device.
Read More